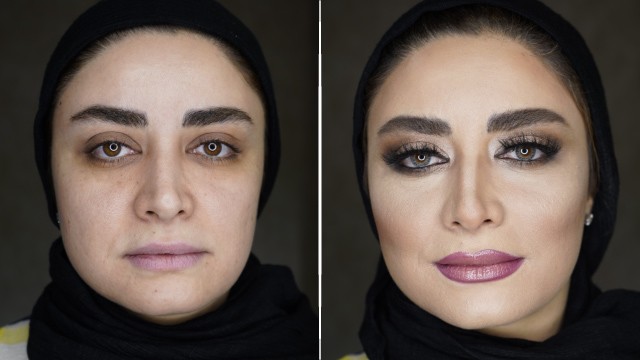
How To: Preparing The Face For Makeup
In this tutorial, we will talk about the methods and techniques we use to take care of skin issues before applying the main makeup. This video was provided by Mrs. Ghasemnezhad. To join our classes, please contact us at , or .
Instructions:
Greeting. I am Ghasemnezhad. I am a makeup artist and instructor. In the previous videos, we spoke about beauty, the anatomy of the face, and makeup. Since lots of you had requests about dealing with skin defects that many clients might have and expect you to take care of for their special occasions, I have decided to talk to you about dealing with different skin types and skin defects.
One of the problems clients often have cannot be solved in one day or before the wedding day. We have to take care of these issues on the day they refer to us to consult. The consultancy process can take place one week to one month before the final makeup session. What I want to show you today is a process you must perform ten days before the primary makeup session. In this video, we will talk about problems that are not specific to one specific night or cannot be solved in a short notice. Things like black rings around the eyes, dryness or oiliness of the T zone, severe acne, pimples, spots on the skin, which can turn into acne, and different types of diseases that can spread on the facial area and make the skin look rough or bumpy. Especially open pores, acne, and hollow points. These are problems we must take care of, before applying the makeup with our foundations or use of other material.
Today I want to work on my client who has a severely dry T zone and the dryness has caused irritation on the face. For a face like this, we must always go through a series of procedures before the main makeup. I want to apply a hydrating and moisturizing package. I will proceed with the work and talk to you about the details of each action. After removing the mask from the face, it is time to apply our final face cream. This cream can contain a series of suitable concentrated substances. After the cream, we need to apply a high-quality sunscreen to protect the face from the rays that the sun or even artificial lights such as neon lights can emit.
After applying the concentrated cream and moisturizer on the skin, I will apply the sunscreen. We have now applied all the required material that could reduce the size of the pores, hydrate the skin, and reduce dryness. We applied the required cleansers, balanced the skin PH, used an enzyme-based peeling product, and scrubbed the face to remove one layer of the skin without damaging it. This scrub also contained skin conditioners and cream to prevent irritation. Next, we used a grainless scrub. Then we used a variety of serums to hydrate the skin and applied a suitable concentrated product to hydrate the skin and make the skin firmer.
For our next step, I used a skin-lightening mask and as a result, the skin looks many degrees lighter. As the last step, I applied a cream. This skin is now completely clean, clear, soft and ready for a makeup application. It is important to reach this level for the skin at least three days before the makeup. We have to perform the required procedures and recommend correct homecare methods.
For the client to use at home to protect their skin. We can then apply a series of concentrated products and serums as a final step on the day of the makeup. This concludes our tutorial. I hope you have enjoyed our video.
